The Birth of a Freeform Peyote Bracelet – Part 3

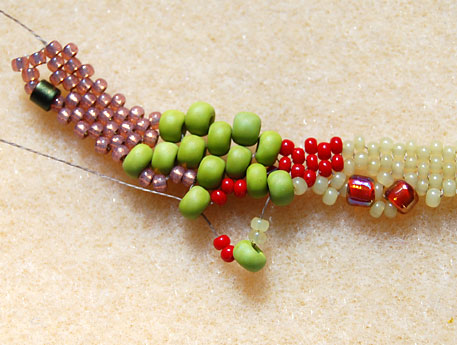
I’ve done some more work on my freeform bracelet and it’s slowly but surely getting wider. Because of the different size beads I’m using, it’s starting to lean to one side on the left end. This will work to my advantage, however, because I want to add a coin shaped freshwater pearl and was looking for the perfect place to put it.

It fits perfectly in this little spot right here. Once I add it, I’ll just bead around it with a loop of beads. This loop will eventually be incorporated into the rest of the bracelet as will the large pearl. In this way, you may add anything you’d like to your piece.

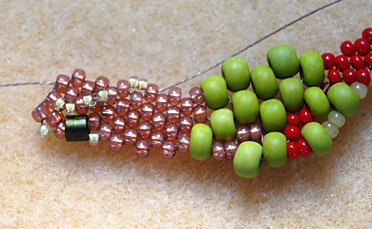
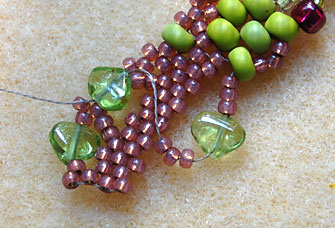
I’ve been adding pearls here and there. I also love to add “bridges”, a loop of beads that cross over from one side to the other. This gives the surface of the piece wonderful texture. You can choose to leave the loop as is or add some more beads to it on your next pass around.

At this stage, I will add the larger beads/objects and then assess which parts of the bracelet need to be built up more. You can leave the edges wavy and uneven or try and even them up before you finish the piece. Also keep in mind that if you add to the ends, it will increase the length of your bracelet, of course. I usually start with a 6 inch length so I can add to the ends without worrying about it getting too big. Another thing to keep in mind is what type of clasp you’d like to add. This will add length to the bracelet as well.

If anyone is being inspired to create their own piece, please let me know. I’d love to see photos!

The Birth of a Freeform Peyote Bracelet – Part 2

Here is what I’ve accomplished today. You can see how I am starting to place the beads in such a way so that the colors are drifting into each other. This will soften that striped look. Because I’m using various size beads, the bracelet starts to get a bit wavy but I can adjust that as I go along by where I place the beads and how many I place.

Sometime I place 2 same size beads at once to fill in a space.

To add a larger size 6 bead, I sandwich it between smaller size 11 beads and make a little bridge by skipping more than the usual one bead.

Or, instead of staying on one side of the bracelet, I can move to the other side by placing size 15 beads (the lighter ones) across the top.

I love to add pearls because they give a lustrous, organic look. Another little bridge. Play with the placement and see which beads work best. Follow your inner voice.

Sometimes bridges can go across to the other side. Those green chips are peridot. I found them at a bead show I went to last spring. The clarity is amazing.

A closeup of one side.

And the other side.

If you want a thinner bracelet, all that’s left to do is to add beads in such a way to even it out and then add a bead/button and loop clasp. The clasp is beaded in a freeform way so that it fits right in with the rest of the bracelet. Because I’m having such a wonderful time with this, I’ve decided to continue beading and make this bracelet wider. Stay tuned for more progress…

The Birth of a Freeform Peyote Bracelet – Part 1

When I woke up yesterday morning, I discovered that the power was off. That was strange because we hadn’t had any storms overnight nor was it terribly windy. I called the power company to be told that they were working on the wires up the street and the power would be restored by 10am. Ok, I guess I could wait for my cup of tea until then. I waited patiently, writing 3 pages of Morning Pages and doing a little reading in my current book, Happy for No Reason. 10am came and went and I called the power company again only to get their automated power outage line. Apparently, I wasn’t the only one who had called in. Without lights, there was no working in my studio so I brought some beadwork out on the deck where there was plentiful sunshine. The power came back on about 7:30 last night when I was out having dinner with a friend who I hadn’t seen in 3 years.

So, what did I do yesterday, you ask? Out there on my sunny deck, another freeform peyote bracelet was born.

I chose 9 different beads in various sizes – 11s, 8s and 6s – and strung about 10-15 beads of each color for a total of 6 inches. I used 2 of the beads twice in my strand for a total of 11 sections. I always string an even number of beads on a neutral color Silamide thread. Silamide is a twisted 2-ply prewaxed thread that has been used by dressmakers for years. Here’s some great information about it. I’ve been using this thread for years now and I really like it. I used to always use Nymo but it tangled too much on me even when I waxed it. I think that the best thread to use is whatever you feel comfortable with and works well for you. Before I added all of my beads, I added one bead, leaving a 6 inch tail, and looped the thread around to go through that bead again. This creates what is called a “stop” bead which prevents the beads from falling off your thread.

In peyote stitch, I added the second row of beads, stopping to tighten every 3 beads or so. You can see how the sections are more accentuated now.

I then added a third row.

From now on I will start adding beads so that the bracelet doesn’t look so striped. I do this by drifting the colors into each other. In my next installment, I’ll show how I do this.

I absolutely love this way of beading. You don’t have to follow a pattern, only a technique and even then, you will be improvising on the technique here and there. Every freeform piece you create is totally unique and expresses your voice, what you were experiencing, thinking of and feeling in the moment. What colors shall I use? Shall I put this color next to that color? What size beads? The more sizes you use, the more textural and wavy your piece will become. It’s a wonderful way to experiment with different beads. There isn’t a right way or wrong way to do it. Just get in the flow and add one or two beads at a time and see where the beads lead you.

A freeform peyote bracelet – the color palette

I’m going to create another freeform peyote bracelet and have picked out my color palette. Some of these beads were used in my faux jade fringy bracelet. I have been very drawn to this muted red/green palette for awhile now.

I thought it would be fun to document my creative process here, step by step. I’ve had this idea in my head for months now and am excited that my life has now slowed down enough to be able to finally do this. Of course, I am still working on my beaded journal page and beaded cabochons, too. Having several projects going at once keeps me motivated and fresh in my process. With each project, I always get to a certain point where it needs to be put down for awhile so the next step can be worked out internally. That’s when I turn to one of my other projects.

Stay tuned for “The Birth of a Freeform Peyote Bracelet”.

Studio Wednesday

I had to go in to my day job for 3 hours right in the middle of the day so, unfortunately, I didn’t get too much work done in my studio today. I was able to get a little beadwork done around this cabochon though. It’s one of my mokume gane polymer clay pieces. The background is one of 6 different fabulous fall color batiked fabrics I purchased on sale at Joann Fabric’s last week. I wanted to get a start with my 2008 beaded journal pages by purchasing some fabric for them. However, after giving some thought about the shape and size of the pages, I’ve decided to do something entirely different from this past year’s format and make either bead embroidered cuff bracelets or some small dolls. If I decide to go ahead with the bracelets, I won’t need the fabric but I’m sure I’ll find something fun to do with them. Right now I’m getting really inspired by just looking at them!

I’ve decided to keep the beading very simple for this cabochon pendant. For the necklace, I’m thinking of multiple strands of seed beads. I love the color of the framing row of seed beads. The photo doesn’t do it justice. It’s an opaque pale green. There’s something about a very pale green that I find so beautiful and yummy.

On the way home from work, I stopped at Staples to get new printer cartridges. When I did a test print of Buddy’s picture the other day, I discovered that I was almost out of ink. Boy, ink cartridges are super expensive! It’s been awhile since I purchased some. Now that I have them, I’m trying to think of what else I can print and create. When I got home, I printed Buddy’s picture on a sheet of Jacquard Inkjet cotton fabric. I’m thrilled at how clear the photo printed and am so excited to finally get started on my final page for the 2007 BJP.