What I created in Julie Picarello’s workshop

To inspire my color palette that day, I purposefully wore my Come Spring vest to the first day of Julie’s workshop. You can read my post about knitting that vest here.

When presented with a choice of metal foil to add to my mokume stack, I chose gold because these cool colors have an underlying warm tone to them.

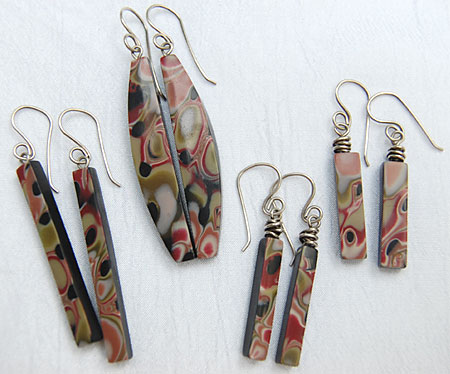
I created 2 pendants and 2 pairs of earring components from my stack. Instead of adding metal embellishments to the components to create jewelry as Julie does, I want to put my own artistic mark on my creations with some seed beadwork.

The “river’ running through the middle of my pendant will have flowing seed beads. You can see from my photo that I’ve started to drill small holes in the “river” so I can couch the strands of flowing beads. As I was working out this idea, I got another one about a beach scene done with half polyclay and half seed bead embroidery!

Coming up soon…how I turned these components into jewelry…

Studio Wednesday

I had to go in to my day job for 3 hours right in the middle of the day so, unfortunately, I didn’t get too much work done in my studio today. I was able to get a little beadwork done around this cabochon though. It’s one of my mokume gane polymer clay pieces. The background is one of 6 different fabulous fall color batiked fabrics I purchased on sale at Joann Fabric’s last week. I wanted to get a start with my 2008 beaded journal pages by purchasing some fabric for them. However, after giving some thought about the shape and size of the pages, I’ve decided to do something entirely different from this past year’s format and make either bead embroidered cuff bracelets or some small dolls. If I decide to go ahead with the bracelets, I won’t need the fabric but I’m sure I’ll find something fun to do with them. Right now I’m getting really inspired by just looking at them!

I’ve decided to keep the beading very simple for this cabochon pendant. For the necklace, I’m thinking of multiple strands of seed beads. I love the color of the framing row of seed beads. The photo doesn’t do it justice. It’s an opaque pale green. There’s something about a very pale green that I find so beautiful and yummy.

On the way home from work, I stopped at Staples to get new printer cartridges. When I did a test print of Buddy’s picture the other day, I discovered that I was almost out of ink. Boy, ink cartridges are super expensive! It’s been awhile since I purchased some. Now that I have them, I’m trying to think of what else I can print and create. When I got home, I printed Buddy’s picture on a sheet of Jacquard Inkjet cotton fabric. I’m thrilled at how clear the photo printed and am so excited to finally get started on my final page for the 2007 BJP.

Studio Wednesday

Today I worked on and finished the beadwork on my faux jade charms fringy bracelet. I’ve ordered some brass and silver Chinese coin charms from Fire Mountain Gems and they should be arriving sometime this week. I want to make a clasp with one of the coins.

The fabric is a painted and stamped piece from an Art Day with friends in June. I really enjoyed transforming a white piece of muslin into colorful fabric.

Using Aleene’s Jewel-it, I glued some polymer clay pieces onto Pellon Peltex 70, an extra firm stabilizer I purchased at Joann Fabric’s. I’m hoping it’s not too stiff for the beadwork I’ll be adding around the pieces. I’ll also probably tone down the white color with some fabric paint. Has anyone ever used this for beadwork?

This first piece was created from a cane I made a long time ago at one of my guild meetings. My friend, Judy, showed us how to make this cane. I think it’s a variation of this scrap feather cane. I didn’t reduce the cane and stretched a slice over some scrap clay to make what looks to me like a cocoon. When I bead around it, I want to enhance its organic feel. It will probably turn into a pendant.

This polymer clay cabochon was created from the mokume gane stack I used to make these earrings. Another pendant, perhaps for a free-form necklace.

More pieces from that mokume gane stack. These will be made into earrings.

Studio Wednesday

It worked! Here are the earrings that I used the epoxy on. After setting for 24 hours, the wire is holding solidly in the polymer clay. Sometimes I think that I have the tendency to get too complicated with my designs so I didn’t add any beads to these earrings. I just wanted a simple design of mokume gane and silver wire. I experimented with just a simple loop and a free-form wrapped loop.

Which do you like better?

I also picked up my May beaded journal page today and started beading again. I’ve been involved in working on other projects lately and, after a year of working on my pages, I feel that I am also reluctant to let the project go and be finished. So, I put it aside for awhile but it’s now time to get it finished and put together. I have set a goal to at least be finished with all of my pages by the time the 2008-09 BJP starts September 1st. Once my pages are complete, the next step is to put them all together into a wall hanging. I would like to sew 4 pages to a backing, the pages lined up one on top of another with some sort of strapping sandwiched between the pages and the backing. Then I will hang the 3 separate pieces of 4 pages from a dowel. By having the 3 separate pieces not sewed to one another, this will give me the freedom to rearrange them according to my mood or the season.

Mokume Gane Earrings

I know, I know. I should be packing and getting ready for my trip. I decided to take a break and do something creative so I finished these earrings. Now I can bring them with me on my trip.

A couple of weeks ago I created a polymer clay mokume gane stack and started playing around with different shapes for jewelry components. Today I glued in some wires, fashioned some earring hooks from 20-gauge S.S. wire and these earrings were born.

I’m experimenting with weaving seed beads around polymer clay components. I especially like the freeform designs of mokume gane to go with freeform beadwork. My most successful color combinations have been when I’ve incorporated light, medium and dark colors. It’s fun looking around the house for various tools and objects to impress into the clay stack. Just mix your colors, create individual sheets, layer them to make a stack and then texture with your found objects. Using a tissue blade, slice from the top of the stack to reveal the patterns. I love watching the patterns emerge. You can make a “fabric” by laying the slices on a coordinating color sheet of clay. I like to take that sheet and run it through the pasta machine to stretch out the patterns so they swirl and dance around.

Ok, back to packing!