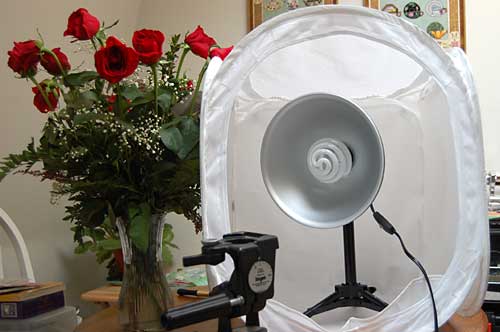
This is my EZ Cube light tent along with one of the two lights that came with the kit I purchased. I put it inside of the tent so I could show what the light looks like.
When I first started taking photographs in the tent, I positioned the lights on either side of it but found that it didn’t illuminate my jewelry the way I wanted it to. The photos kept coming out too dark. I now take the lights off of their little stands and sit them right on top of the tent. Since I always use the timer for taking a shot, I have time to raise the lights a little and hold them into a position where I want them.
You can see the top of my tripod in front of the tent. A tripod is invaluable for taking photos of your jewelry as you will probably use very slow shutters speeds. You shouldn’t hand hold your camera if the shutter speed is slower than the length of the lens. In other words, if you are using a 50mm lens then you should use a tripod for speeds of 1/50th of a second or slower.
The tent diffuses the light so you don’t end up with glaring hot spots on your jewelry. I have been using a gradient paper background but have found that this type of paper scratches very easily. I noticed in some professional jewelry photographs that the background is gradient and reflective so I wonder if that is some sort of glass or plexi-glass background. In my next round of experiments, I want to try using fabric as a background.
So, a lot of my jewelry photography has been trial and error, seeing what works and what doesn’t. The website Etsy has been an invaluable resource for me to look at jewelry photographs and see what kinds of shots I like and what doesn’t work. I have learned that there are a lot of jewelry photographs out there that are just too dark, including a lot that are presently on my website. Before I purchased my light tent, I took outside shots and also used a rubbermaid container for indoor shots.
For taking professional looking photographs of your jewelry or artwork, I highly recommend finding a way to diffuse your lights and using a tripod. A camera with a macro lens and a timer is also very valuable.
Have fun experimenting!

Thanks for the tips.
I have seen the tents, but did not know anyone that actually used them. I really appreciate your sharing.
I have one too, but haven’t used it yet as I had the same problem of the lights not shining enough into the cube…now I can try hand holding them…thanks!
Great idea, Karen, putting the lights on top of the cube…I haven’t tried that. I recently got a very small (12″ sq.) light cube, since I really don’t need my huge 30″ sq. one for most of my shots. The small cube is a lot easier to illuminate. Most of my photos so far are of raw canes. The colors and detail show up quite well in the photos. Canes, however, are a lot easier to photograph than jewelry! I have not attempted to photograph jewelry with the small tent yet. I agree that a tripod is a must. A timer is a good idea too, I’ll have to give it a try once I figure out how to use it.
Good jewelry photography has a steep learning curve, that’s for sure!
You’re quite welcome, Brenda. A light tent is the best thing I’ve used for diffusing the light.
Yes, Bobbi, putting the lights on the top of the cube made a huge difference. If you don’t have any dome lights yet, I think you can get them at Home Depot or Lowe’s and then fit them with a full spectrum bulb.
Great idea Dora, about the smaller cube. I got one as part of my kit and hadn’t opened it yet. I’ll have to start experimenting with that, too! Using the timer on your camera is a good idea when using slow shutter speeds. I have a timer button by the lens on my Nikon. You just press it to activate the timer mode and then press the shutter to start the countdown.
At the minute I sometimes use tracing paper taped over two Ott lights to diffuse certain photos. I only have a point and shoot digital camera though.
I had planned to buy one of the gradient sheets at the camera store, so your comments on scratching were interesting. I bought a book called “Photographing Arts, Crafts & Collectibles” by Steve Meltzer that ahs some good tips.
Thanks for visiting and commenting, JJ. I store the gradient paper in a plastic sleeve and am very careful with it so I’m not sure where the scratching came from. It does show up big-time in the photos though and I have to then spend more time in Photoshop touching up.
That book sounds great, I’ll have to look for it.
-Karen