Studio Wednesday

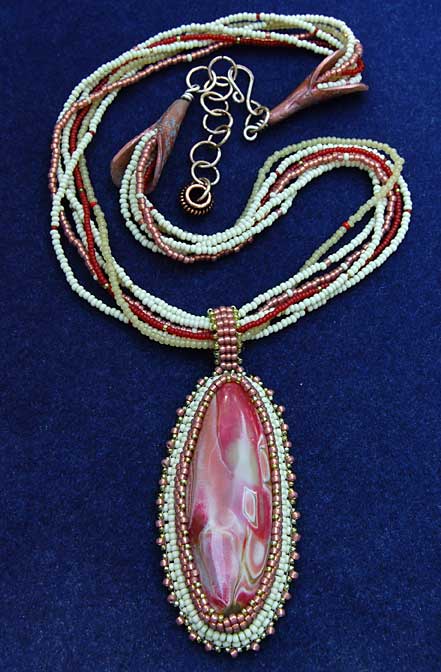
Recently, a colleague of Dave’s (my S.O.) came back from a trip to New Mexico with a wonderful bead and cabochon stash that she generously shared with me. I couldn’t resist this gorgeous turquoise cabochon. With all of the variegated tan and brown swirls in it, it reminds me of a satellite view of Earth. I was pleased to dig through my own seed bead stash to find a hank of size 11 gold luster caramel colored beads I purchased in Frankenmuth, Michigan last year. I think they frame the cab very nicely.

Originally, I wanted to use this cab for my first journal bracelet but it’s too large for a bracelet. Instead, I chose a glazed porcelain face I purchased at a bead show last spring. In honor of the Fall Equinox this month, I want to create a bracelet of many leaves framing the face cab. I also want to honor the majestic oak and maple trees we had taken down 2 days ago. Unfortunately, they were getting too dangerously close to the house. Even though we will use the wood to warm our house next winter, I still felt very sad to see them come down. My bracelet will remind me of these wonderful tree beings.

I also worked on my freeform peyote bracelet today. I’ll post on my progress tomorrow…

Studio Wednesday

Today was devoted to finishing my beaded mokume gane cabochon necklace.

This necklace evolved one step at a time without any sketches or set plan. First, I created the polymer clay cabochon with slices from a mokume gane stack. Then I glued the cabochon to a piece of heavyweight Pellon Peltex 70 and beaded around it. I sat with the pendant for awhile meditating on what kind of necklace would feature it best. I decided on a multi-strand seed bead necklace.

After creating the 6-strand seed bead necklace, I added a beaded bail at the top of the cabochon. The open cones at the end of the strands are made from polymer clay with a copper mica powder rubbed in before baking. I also textured the cone with a piece of coral before rubbing in the powder. My intent with the cones is to make it look like the beads are spilling out of them. A cascade of beads. 16-gauge sterling silver was used to form the hook clasp with jumpring chain extender. I dipped the silver wire in a liver of sulfur solution until the wire was coppery brown.

I spent most of the day in my studio. I was so intent on my work that I never got a chance to go outside and enjoy the beautiful day. Now it’s time for a nice long walk!

12 months of beading

I am happy to present a year’s worth of beaded journal pages!

The first row (at the top, l to r) is June – September 2007, the second row October 2007- January 2008 and the third row February – May 2008.

When I finished my last page, I was so excited. When I look at this group shot, I am beyond excited and into jumping up and down ecstatic and really amazed that I actually did this.

I want to send a huge thank you and hug to my beady hero and mentor, the creator of the Beaded Journal Project, Robin Atkins. Her vision and inspiration has changed the lives of many artists through this amazing and wonderful project. I feel like my life has changed in an enormous way as I have learned much about myself through my beadwork and also to my commitment to stick with this project.

To all of my fellow BJP participants, bravo to one and all!

My last beaded journal page is done

Well, talk about getting down to the wire! With the 2008-09 Beaded Journal Project poised to begin tomorrow, I have completed my last page of the 2007-08 year, my November 2007 page. With my annual jewelry show in November, that whole month is dedicated to preparing for my show. Instead of creating my November page in December then, I was inspired to jump right into my December page at that time. So, November never got done until now. However, I always had what I wanted to create, a tribute page to my greyhound Buddy, in my mind. It was just a matter of getting the fabric paper to put in my printer, updating my printer cartridges and getting started on it.

I’m so glad to be finished with all of my pages. I feel a great sense of accomplishment even though I finished late. Now it is time to turn my sights to the new year and start on my first bracelet!

The Birth of a Freeform Peyote Bracelet – Part 3

I’ve done some more work on my freeform bracelet and it’s slowly but surely getting wider. Because of the different size beads I’m using, it’s starting to lean to one side on the left end. This will work to my advantage, however, because I want to add a coin shaped freshwater pearl and was looking for the perfect place to put it.

It fits perfectly in this little spot right here. Once I add it, I’ll just bead around it with a loop of beads. This loop will eventually be incorporated into the rest of the bracelet as will the large pearl. In this way, you may add anything you’d like to your piece.

I’ve been adding pearls here and there. I also love to add “bridges”, a loop of beads that cross over from one side to the other. This gives the surface of the piece wonderful texture. You can choose to leave the loop as is or add some more beads to it on your next pass around.

At this stage, I will add the larger beads/objects and then assess which parts of the bracelet need to be built up more. You can leave the edges wavy and uneven or try and even them up before you finish the piece. Also keep in mind that if you add to the ends, it will increase the length of your bracelet, of course. I usually start with a 6 inch length so I can add to the ends without worrying about it getting too big. Another thing to keep in mind is what type of clasp you’d like to add. This will add length to the bracelet as well.

If anyone is being inspired to create their own piece, please let me know. I’d love to see photos!