Woodland Fairy and Early Spring

Tonight I conducted some more photo experiments. I purchased background papers at A.C. Moore yesterday and arranged my “Woodland Fairy” necklace (on left) down on the paper. Because of the shape of the necklace, I decided that laying it on the paper didn’t display the necklace very well at all so I placed it on a black velvet bust I have from my show display. I thought this looked a lot better.

woodlandfairynecklace.jpgearlyspringnecklace.jpg

With my “Early Spring” necklace (on right), I decided to lay it down on the background paper. It looked much better laying down than the other necklace did but now I’m wondering if I should place it on a natural prop like a stone or a piece of wood. What do you think?

I wanted to contrast 2 types of placement. Back to my experimenting!

Lighting a Secret Garden

My new Tabletop Studio has arrived and I set it up today. Other than an odd plastic smell emanating from them, the pieces were packed very well and easy to put together. The tents themselves look like square white laundry bags, the kind I bought for my daughter when she went off to college. My setup came with a 12″ and a 20″ cube. They both fold up flat and fit into a nifty carry bag. I’ll probably use both cubes since I’m photographing jewelry.

secretgardentabletop.jpg

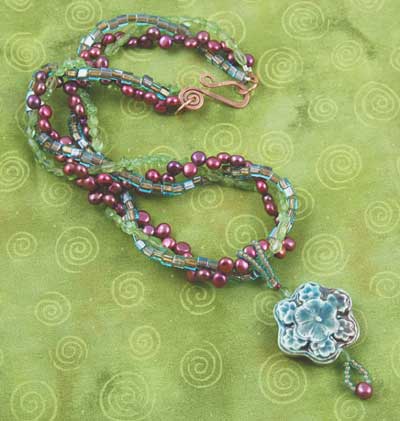
I didn’t get any of their graduated backgrounds yet so I used some brightly colored fabric I had. Even though the fabric matches the necklace, it’s probably too brightly colored for this purpose. I do love that green though! The light is nice and even and shows off the beads pretty well. I closed my aperture way down (f16) to get maximum depth of field and used a manual focus.

secretgardensun.jpg

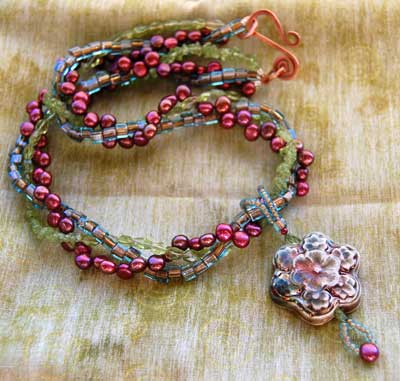
For comparison, I took a shot in full sun. It’s way too harsh with many shadows and the colors in the necklace are all bleached out. It does show the texture in the raku flower pendant that the Tabletop Studio shot did not. So, even though the sun shot has more dimensionality, it’s not good for the purpose intended here.

secretgardensunpaper.jpg

This is the same shot but I put a piece of printer paper between the sunshine and the necklace. Oh yes, I also turned the fabric over to see what the other side would look like. Actually, I like this shot a lot because it shows off the colors in the necklace and the texture in the pendant. Since I didn’t have the camera on the tripod, I couldn’t close down the aperture like I did with the Tabletop shot so it doesn’t have the same depth of field. I also used the auto focus mode for the 2 sun shots.

Open stock paper is on sale at A.C. Moore this week so I’ll go choose some different backgrounds and continue to experiment.

I’ve named my necklace “Secret Garden” because the pendant and the colors remind me of one of my most favorite childhood stories. I acquired the raku pendant during a trip to the Big Island of Hawaii 3 years ago. The braided necklace strands are peridot, pearl and square bronze-lined aqua glass beads. I created the clasp from 16-gauge copper wire. I also made a matching bracelet and earrings. Stay tuned for their photo shoots!

Chunky Bead Crochet Bracelet

crochetedchunkybracelet.jpg

My first experiment with bead crochet resulted in this chunky bracelet. When I was in Michigan last month, I visited a yarn shop with my Mom who is an avid stitcher and knitter. From the moment I stepped through the front door, I was entranced with the bins upon bins of colorful, textured yarn skeins. All of those colors! It was like opening up a new box of crayons. I carefully made a couple of selections, having no idea what I was going to do with them. I just liked to look at them and feel their weight in my hands.

After reading Lindly Haunani’s post about setting creative goals for the fall, I wrote down 4 things that I would like to accomplish and explore. One of them was to teach myself bead crochet and experiment with various fibers and beads. A great resource for helping me achieve this goal is Bethany Barry’s Bead Crochet. So, I went through my bead stash and choose some colorful size 6 beads to match the colorful yarn I had purchased.

crochetedchunkybraceletclos.jpg

I single crocheted a tube 6 beads around and then finished it with a vintage button clasp. With a chain loop that fits over the button, I was amazed at how easy it is to put it on and take it off. My next experiment is going to be with size 8 beads and C-Lon cord. Stay tuned!

Rainforest Choker

rainforestchoker.jpg

Here’s my latest creation. This choker style necklace was inspired by a wonderfully inspiring and colorful book called Rainforest. It’s filled with gorgeous closeups of plants, birds, animals and insects found in the rainforests around the world. I highly recommend it to add to your inspiration library.

rainforestbead.jpgrainforestchokerclosure.jpg

I made the polymer clay bead by covering it with canework and molding it into the oval shape. The cane itself is a Skinner blend bullseye plug separated into 5 pieces which is then layered and surrounded with a striped cane. I capped the ends of the bead with the same stripes. The cord is a woven herringbone tube strung on soft flex wire. The fit of the tube on the beading wire is tight so I was able to twist the tube. As I was stringing it, the tube kept twisting anyway so I figured that’s the way it wanted to be. Despite careful design planning, my jewelry sometimes develops a life of its own as I am creating it! I finished the choker with a button made from the cane and a simple beaded loop. Now, it’s time to make a bracelet and earrings to match!


Google

One of my favorites beaders, Diana Grygo, otherwise known as the Lone Beader, has asked her fellow bloggers to mention her name in a post to sort out a Google searching issue. Here you go, Diana. Your beadart rocks!

I’ve been feverishly working on a commission for wedding jewelry which, at the moment, has pretty much taken over all of my spare time. A post on Klay Karma 2007 soon! Ah, a walk on the beach would be lovely right about now..

jerseyshore5.jpg