ACC Show and Synergy Wrapup

There were over 700 artist vendors participating in the ACC Show at the Baltimore Convention Center a couple of weeks ago. Since we were a little pressed for time because we were meeting friends for dinner, we walked the show in an hour and fifteen minutes. There were so many beautiful art pieces that caught my eye but I could only stop and savor a few.

carolowen.jpg

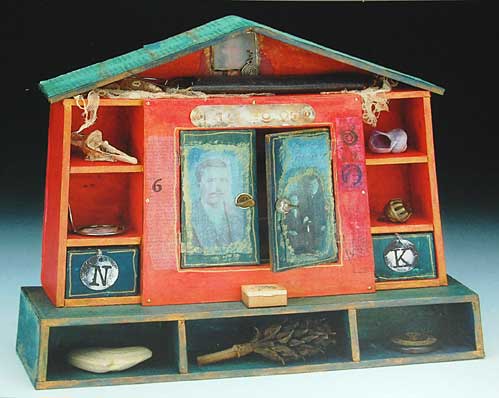
Carol Owen creates “Spirit Houses” from all sorts of ephemera and mixed media. “My Spirit Houses are shrines to family memories. They make sacred those shards of the past that have made us what we are.” I found myself so drawn to these little shrines, wanting to open the doors and peer inside. In our dreams, the house can be a symbol for ourselves and each room a different aspect of who we are. So, I think I loved her work so much because it reminded me of my dreams. I love this quote from her website:

“Every spirit builds itself a house, and beyond its house, a world, and beyond its world, a heaven. Know then that a world exists for you.”
– Ralph Waldo Emerson

karensmith.jpg

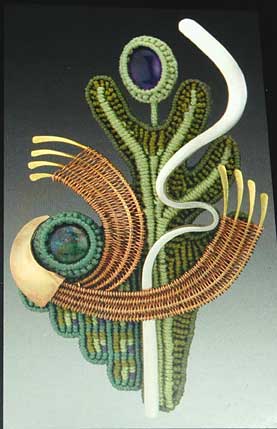
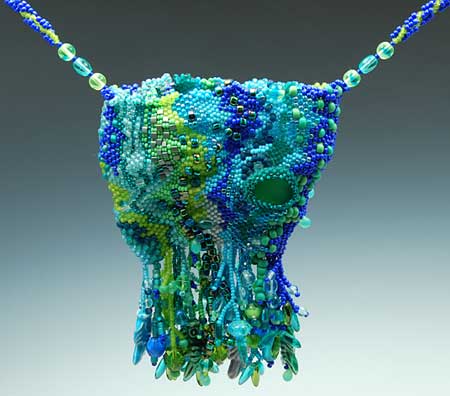
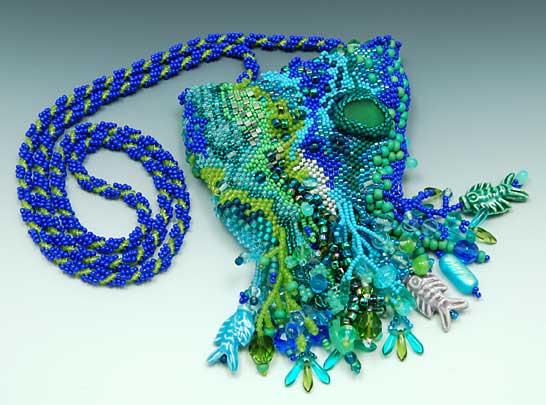
Karen Smith creates jewelry combining fiber, stones and metal. I found myself very drawn to her work because it reminded me of ancient tribal pieces. It spoke to something very deep within as I gazed upon the rich weavings encasing gorgeous stones. I was so disappointed to see that she doesn’t have a website or a blog because I wanted to read more about her work. I am so intrigued by the idea of incorporating fiber into jewelry pieces.

kimberlywillcox.jpg

Kimberly Willcox makes the most amazing sculptures, as described on her business postcard “A Contemporary Spin on Primitive Form”. She shares with us: “My goal is to create a unique art form that shares a seamless integration between the world and the human spirit.”

I think that she accomplishes her goal quite wonderfully. Her sculptures seems to incorporate all sorts of materials including but not limited to wood and metal. I wonder what she uses to sculpt her faces.

To see the work of more ACC artists, you can read my friend, Amy’s, account here.

So, that concludes my account of all of my experiences at the 2008 Synergy Conference.

A huge thank you to all of the fabulous artists who worked so hard to make this event come true!

My Freeform Beaded Amulet Bag

freeformseaamuletbaghang.jpg

A few weeks ago, I wrote about a freeform peyote bracelet I created and referenced an amulet bag I had created years ago that inspired the bracelet. Here is the amulet bag. I did some experimenting with hanging the bag within my light tent. My kit came with some hanging clips so I hung the bag from the clips so I could take a photo with the fringe hanging naturally and freely. The sea glass I encased on the front of the bag was found on a beachcombing expedition when I visited Maui a couple of years ago. I added that on after the bag was finished. The ceramic fish and seahorse beads were purchased during a trip to Nantucket.

freeformseaamuletbaglay.jpg

The strap is done in a spiral stitch. It took many hours to finish the bag over the course of 4 years, working on and off during a challenging time in my life. So, the freeform peyote technique and its meditative qualities will always represent healing to me. Maybe that is why I’m drawn to it so much.

My Synergy Purchases

sarahshriverearrings.jpg

I totally love these earrings! I purchased them at the Synergy Gallery where over 80 amazing polymer clay artists displayed and sold their creations. My gift to myself. They were created by Sarah Shriver with her fabulous kaleidoscope cane technique. The cane design is so organic, like ferny tendrils. As I was taking the photos of my Synergy purchases, I noticed an interesting color theme going on.

synergypaint.jpg

These Stewart Gill paints match the earrings. I purchased the earrings first so I must have had those great colors in my mind when I picked out these paints. And this Amaco Fun Wire.

synergyfunwire.jpg

I can’t wait to play!

My Synergy Experience

baltimoredawn.jpg

The dawn of the first day of the Synergy conference in Baltimore. I stayed at the Tremont Plaza Hotel, located about 1/2 mile from the Baltimore Convention Center where the conference was being held. The room that I shared with my friend, Amy, was quite spacious with a kitchenette, sitting area and 2 big feather beds. We could eat breakfast in our room and it was very comfortable for sleeping. We walked back and forth to the conference center everyday. The brisk walk and crisp winter air helped to wake us up for our first morning class at 8:30am. The 3 days were so jam packed with classes, panel discussions and guest lectures that I am still digesting the volume of information I absorbed and recorded in my notebook.

Jeffrey Lloyd Dever has a 20 year background in graphic design. He shared slides of his amazing work in polymer clay and its progression from vessels to pod shaped jewelry. His art graces the cover of the latest issue of Art Jewelry magazine. The article explains how he creates his pod forms and he also shared this process with us in class. There is also a chapter on his “Sculptural Pod Necklace” in Katherine Duncan Aimone’s book The Art of Jewelry: Polymer Clay.

Robert Dancik is a mixed media artist with a background in teaching at all levels from elementary school through college. A very engaging teacher, he opened both classes I attended with the sounding of a small Tibetan singing bowl. Its soothing sound helped to create a shift in our brains that opened us up more fully to the information he shared with us on artistic technique and process. We learned about Cold Connections such as riveting, tabs and prongs, and nuts and bolts. These techniques are from the metal world but can easily be used in polymer clay creations. My all-time favorite class was entitled “Dance to the MUSEik”, where he discussed various ways to access your artistic voice.

Lindly Haunani is very well known in the polymer clay community as an expert on color. I took 2 classes with Lindly, one on color confidence, which she taught with another queen of color, Maggie Maggio, and one called Teaching 101. She is such an entertaining teacher and as I laughed at her colorful stories and techniques, I felt myself opening to my playful child within. Lindly is very much in touch with that playful child and I would love to take a color workshop with her someday. There is much to learn.

Maggie Maggio is writing a color book with Lindly. Hooray! She has a wonderful blog called Smashing Color. As its name suggests, it is all about color and has shared tutorials about making color scales and practicing with color mixing. Her beautiful jewelry displays her amazing color sense flawlessly.

Sarah Shriver is best known in the polymer clay community for her intricate kaleidoscope canework. Her class was called “A Teacher’s Quandry”, all about the challenges she faces in teaching her exacting technique. This sparked a lively discussion which carried through into some of the panel discussions on finding your own voice in your art. A teacher would like to facilitate the discovery of that voice in each one of her/his students but the quandry results when you are teaching a specific technique and the project causes an imitation to be created. As the question of finding your voice and expressing it in your art has been a journey I have been on within the last few years, I was most fascinated and intrigued by these discussions. What constitutes true art? Does all art have to actually say something? What and who determines this?

Karen Woods is a weaver and fiber artist. In her class, Unconventional Polymer, she shared her explorations of combining polymer clay with basket weaving. She also showed us a slideshow of magnificent work of artists from polymer clay, fiber, glass and paper arts. She is an enthusiastic proponent of letting your work be inspired by many different materials.

Judy Kuskin is a jewelry artist, marrying polymer clay with metal in her beautifully graphic pieces. We explored asymmetrical design elements with her in a slideshow of the work of various polymer clay artists. I learned that one of the key words of asymmetrical design is balance.

More in my next post on the guest speakers and panel discussions…

My EZ Cube Light Tent

photosetup.jpg

This is my EZ Cube light tent along with one of the two lights that came with the kit I purchased. I put it inside of the tent so I could show what the light looks like.

When I first started taking photographs in the tent, I positioned the lights on either side of it but found that it didn’t illuminate my jewelry the way I wanted it to. The photos kept coming out too dark. I now take the lights off of their little stands and sit them right on top of the tent. Since I always use the timer for taking a shot, I have time to raise the lights a little and hold them into a position where I want them.

You can see the top of my tripod in front of the tent. A tripod is invaluable for taking photos of your jewelry as you will probably use very slow shutters speeds. You shouldn’t hand hold your camera if the shutter speed is slower than the length of the lens. In other words, if you are using a 50mm lens then you should use a tripod for speeds of 1/50th of a second or slower.

The tent diffuses the light so you don’t end up with glaring hot spots on your jewelry. I have been using a gradient paper background but have found that this type of paper scratches very easily. I noticed in some professional jewelry photographs that the background is gradient and reflective so I wonder if that is some sort of glass or plexi-glass background. In my next round of experiments, I want to try using fabric as a background.

So, a lot of my jewelry photography has been trial and error, seeing what works and what doesn’t. The website Etsy has been an invaluable resource for me to look at jewelry photographs and see what kinds of shots I like and what doesn’t work. I have learned that there are a lot of jewelry photographs out there that are just too dark, including a lot that are presently on my website. Before I purchased my light tent, I took outside shots and also used a rubbermaid container for indoor shots.

For taking professional looking photographs of your jewelry or artwork, I highly recommend finding a way to diffuse your lights and using a tripod. A camera with a macro lens and a timer is also very valuable.

Have fun experimenting!